2024. 11. 12. 11:01ㆍC++프로그래밍/수업 내용 및 수업 후 과제
Function overloading을 지원하는 프로그래밍 언어
1. Ada[1]
2. Apex[1]
3. C++[1][2]
4. C#[1][2]
5. Clojure[1]
6. Swift[1][3]
7. Fortran[1]
8. Kotlin[1][4]
9. Java[1][2]
10. Julia[1]
11. PostgreSQL 및 PL/SQL[1]
12. Scala[1]
13. TypeScript[1]
14. Visual Basic (.NET)[1]
15. Wolfram Language[1]
16. Elixir[1]
17. Nim[1]
18. Crystal[1]
19. Delphi[1]
객체 지향 프로그래밍의 4가지 주요 특징을 잘 보여주는 C++ 소스 코드
#include <iostream>
#include <string>
using namespace std;

// 추상화와 캡슐화를 보여주는 추상 클래스
class Animal {
protected:
    string name;

public:
    Animal(string n) : name(n) {}
    virtual void makeSound() = 0; // 순수 가상 함수

    void setName(string n) {
        name = n;
    }

    string getName() const {
        return name;
    }
};

// 상속을 보여주는 Dog 클래스
class Dog : public Animal {
public:
    Dog(string n) : Animal(n) {}

    void makeSound() override {
        cout << name << " 멍멍!" << endl;
    }

    void fetch() {
        cout << name << "가 공을 물어옵니다." << endl;
    }
};

// 상속을 보여주는 Cat 클래스
class Cat : public Animal {
public:
    Cat(string n) : Animal(n) {}

    void makeSound() override {
        cout << name << " 야옹!" << endl;
    }

    void scratch() {
        cout << name << "가 긁습니다." << endl;
    }
};

// 다형성을 보여주는 함수
void animalSound(Animal* animal) {
    animal->makeSound();
}

int main() {
    Dog dog("멍멍이");
    Cat cat("야옹이");

    dog.setName("바둑이");
    cout << dog.getName() << endl;

    animalSound(&dog);
    animalSound(&cat);

    dog.fetch();
    cat.scratch();

    return 0;
}
이 코드는 객체 지향 프로그래밍의 4가지 주요 특징을 모두 보여줍니다:
1. 추상화 (Abstraction):
`Animal` 클래스는 추상 클래스로, 모든 동물의 공통적인 특성을 추상화합니다. `makeSound()` 함수는 순수 가상 함수로 선언되어 있어, 이를 상속받는 클래스에서 반드시 구현해야 합니다.
2. 캡슐화 (Encapsulation):
`Animal` 클래스의 `name` 멤버 변수는 `protected`로 선언되어 있고, 이를 접근하기 위한 `setName()`과 `getName()` 함수를 제공합니다. 이는 데이터를 숨기고 접근 방법을 제한하는 캡슐화의 예입니다.
3. 상속 (Inheritance):
`Dog`와 `Cat` 클래스는 `Animal` 클래스를 상속받아 그 특성을 재사용하고 있습니다. 두 클래스는 `Animal`의 멤버를 상속받으면서 각자의 고유한 메서드(`fetch()`, `scratch()`)도 가지고 있습니다.
4. 다형성 (Polymorphism):
`animalSound()` 함수는 `Animal` 포인터를 매개변수로 받아 `makeSound()` 함수를 호출합니다. 이 함수는 `Dog`나 `Cat` 객체 모두에 대해 동작하며, 각 객체의 실제 타입에 따라 적절한 `makeSound()` 구현이 호출됩니다. 이는 다형성의 예시입니다.
이 코드를 실행하면, 다양한 동물 객체들이 생성되고 각각의 특성에 맞게 동작하는 것을 볼 수 있음
이를 통해 객체 지향 프로그래밍의 주요 특징들이 실제로 어떻게 적용되는지 이해가능
↓
객체 지향 언어의 4가지 특징을 표로 정리
| 특징 | 설명 |
| 추상화 | 복잡한 현실 세계의 개념을 단순화하여 중요한 부분만을 모델링함. |
| 캡슐화 | 데이터와 메서드를 하나의 단위로 묶고, 외부에서 접근을 제한함. |
| 상속 | 기존 클래스를 기반으로 새로운 클래스를 생성하여 코드 재사용을 촉진함. |
| 다형성 | 동일한 인터페이스를 통해 서로 다른 객체가 다양한 방식으로 동작할 수 있도록 함. |

자동형 변환을 코어션이라고 한다
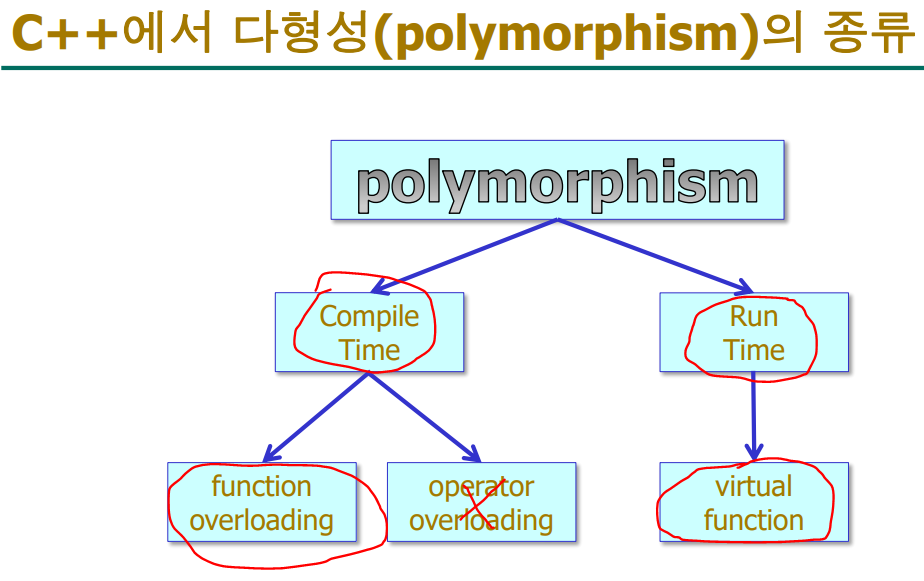
- c++은 함수 중첩 가능
앞의 세 함수 add_i, add_f, add_d는 같은 작업을 수행하지만 매개변수의 자료형에 따라 각각 다른 이름을 부여하고 있다.
C++ 에서는 함수 중첩을 이용하여 프로그램을 이해하기 쉽게 작성할 수 있다.
즉, 다음과 같이 같은 이름을 부여할 수 있다.
컴파일러가 매개변수의 입력 자료형에 따라서 자동적으로 해당 함수를 연결해준다.
자료형에 따라 자동으로 해당 함수를 쓴다
이것을 함수 오버로딩이라고 한다
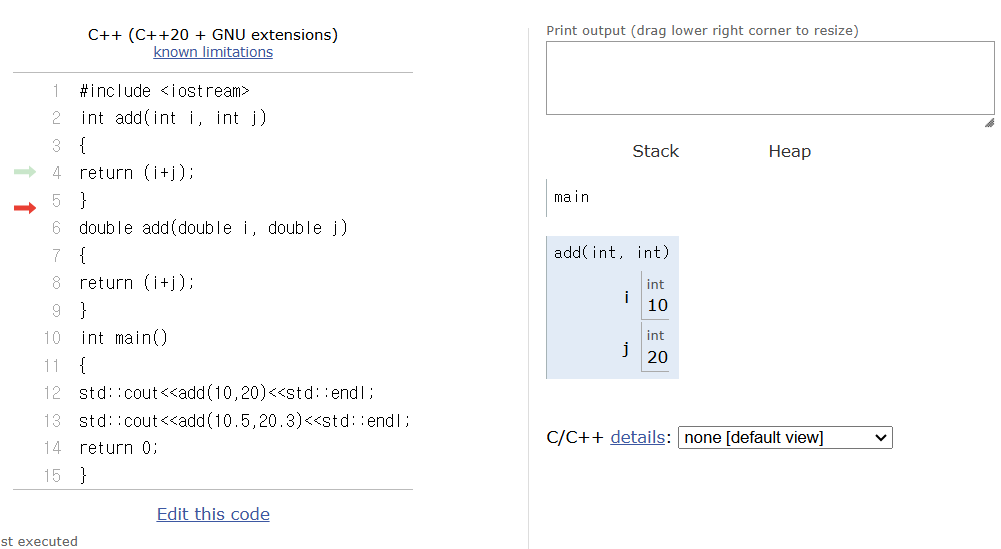
#include <iostream>
int add(int i, int j)
{
return (i+j);
}
double add(double i, double j)
{
return (i+j);
}
int main()
{
std::cout<<add(10,20)<<std::endl;
std::cout<<add(10.5,20.3)<<std::endl;
return 0;
}
c언어에서는 아래처럼 써야했지만 c++에서는 위쪽 코드로 쓸 수 있음
#include <iostream>
int add1(int i, int j)
{
	return (i + j);
}
double add2(double i, double j)
{
	return (i + j);
}
int main()
{
	std::cout << add1(10, 20) << std::endl;
	std::cout << add2(10.5, 20.3) << std::endl;
	return 0;
}
double형 한개 더 추가
// 실습 6-1: 함수 중첩 예
#include <iostream>
int add(int i, int j)
{
	return (i + j);
}
double add(double i, double j)
{
	return (i + j);
}
double add(int i, int j)
{
	return ((double)i + (double)j);
}
int main()
{
	std::cout << add(10, 20) << std::endl;
	std::cout << add(10.5, 20.3) << std::endl;
	return 0;
}
//첫번째 add함수와 세번째 add함수중에 어떤 함수를 호출해야할지 모르기 때문에
//이렇게 함수 중첩을 사용하는건 안된다.
//"overloaded functions only differ by return type"
//'double add(int,int)' : 오버로드된 함수가 'int add(int,int)'과(와) 반환 형식만 다릅니다.
자료형은 같고 리턴형만 다른 경우에는 오버로드가 되지 않기 때문에 위의 코드는 오류가 발생 ↑
실습 6-2: 함수 중첩 예
임의의 형의 두 매개변수 중 큰 값을 반환하는 Max()라는 함수를 작성하시오. 즉,
Max()함수가 매개변수로 int, double, char 등을 모두 가질 수 있도록 함수를 중첩시키시오.
#include <iostream>
int Max(int i, int j)
{
return i>j ?i:j;
}
double Max(double i, double j)
{
return i>j ?i:j;
}
char Max(char i, char j)
{
return i>j ?i:j;
}
int main()
{
std::cout<< Max(1,2)<<std::endl;
std::cout<< Max(7.5,3.6)<<std::endl;
std::cout<< Max('A','B');
return 0;
}
실습 6-3: 함수중첩 : C vs. C++

#include <iostream>
int add2(int i, int j)
{
return (i+j);
}
int add3(int i, int j, int k)
{
return (i+j+k);
}
int add4(int i, int j, int k, int l)
{
return (i+j+k+l);
}
int main()
{
std::cout<<add2(1,2)<<std::endl;
std::cout<<add3(1,2,3)<<std::endl;
std::cout<<add4(1,2,3,4)<<std::endl;
return 0;
} //오버로딩 안함

이 코드를
#include <iostream>
int add(int i, int j)
{
return (i+j);
}
int add(int i, int j, int k)
{
return (i+j+k);
}
int add(int i, int j, int k, int l)
{
return (i+j+k+l);
}
int main()
{
std::cout<<add(1,2)<<std::endl;
std::cout<<add(1,2,3)<<std::endl;
std::cout<<add(1,2,3,4)<<std::endl;
return 0;
} //오버로딩 함

이렇게 바꿔서 개수가 달라도
매개 변수의 자료형이 다르면함수 오버로딩이 가능하다
컴파일러가 실매개변수의 개수에 따라서
자동적으로 해당 함수를 연결해준다.
함수중첩을 하는 2가지 경우
아래의 2가지는 기말고사에 항상 나오는 코드이다
// 1. 매개변수의 형이 다른 경우
#include <iostream> // 입출력 스트림을 사용하기 위한 헤더 파일 포함
// 정수형 매개변수를 받는 add 함수
int add(int i, int j)
{
return (i+j); // 두 정수의 합을 반환
}
// float형 매개변수를 받는 add 함수
float add(float i, float j)
{
return (i+j); // 두 float의 합을 반환
}
// double형 매개변수를 받는 add 함수
double add(double i, double j)
{
return (i+j); // 두 double의 합을 반환
}
int main()
{
// 정수형 add 함수 호출
std::cout << add(1,2) << std::endl; // 출력: 3
// float형 add 함수 호출 (f 접미사로 float 리터럴 표시)
std::cout << add(1.3f, 2.6f) << std::endl; // 출력: 3.9
// double형 add 함수 호출
std::cout << add(6.5, 3.8) << std::endl; // 출력: 10.3
return 0;
}
// 위의 첫번째 코드를 변환
#include <iostream>
int add(int i, int j)
{
return (i + j);
}
float add(float i, float j)
{
return (i + j);
}
double add(double i, double j)
{
return (i + j);
}
int add(int i, int j)
{
return (i + j);
}
int add(int i, int j, int k)
{
return (i + j + k);
}
int add(int i, int j, int k, int l)
{
return (i + j + k + l);
}
int main()
{
std::cout << add(1, 2) << std::endl;
std::cout << add(1.3f, 2.6f) << std::endl;
std::cout << add(6.5, 3.8) << std::endl;
std::cout << add(1, 2, 3) << std::endl;
std::cout << add(1, 2, 3, 4) << std::endl;
return 0;
}
// 오버로드는 자료형의 개수가 다르면 실행 가능
// 같은 이름의 함수를 여러개 쓸 수 있다- 생성자 중첩
클래스의 멤버함수도 중첩이 가능하고, 생성자도 물론 중첩이 가능하다.
하지만 소멸자는 중첩이 불가능하다.
생성자 함수도 매개변수를 가질 수 있기 때문, 매개변수의 수나 자료형에 따라 여러 개의 생성자 함수를 중첩할 수 있다.
생성자 함수를 중첩시키는 것은 객체에 초기값을 다양하게 주는 선택 기회를 제공하는 것이다
생성자 함수 중첩
(실습 6-4: 생성자 중첩 예 비슷함)

1단계 class 만들기

#include <iostream>
class Dog {

};
int main()
{
	return 0;
}

2단계 맴버 변수 추가
#include <iostream>
class Dog {
private:
	int age;
};
int main()
{
	return 0;
}

3단계 입출력 함수 get,set 만들기
#include <iostream>
class Dog {
private:
	int age;
public:
	getAge() {}
	setAge(){}
};
int main()
{
	return 0;
}

4단계getAge 함수 완성
#include <iostream>
class Dog {
private:
	int age;
public:
	int getAge() {
		return age;

	}
	setAge(){}
};
int main()
{
	return 0;
}

5단계 setAge 함수 완성
#include <iostream>
class Dog {
private:
	int age;
public:
	int getAge() {
		return age;

	}
	void setAge(int a) {
		age = a;
	}
};
int main()
{
	return 0;
}

6단계 나이 값 바꾸거나 출력하거나 입력
#include <iostream>
class Dog {
private:
	int age;
public:
	int getAge() {
		return age;

	}
	void setAge(int a) {
		age = a;
	}
};
int main()
{
	Dog coco;
	COCO.setAge(3);
	std::cout << coco.getAge();

	return 0;
}

7단게 생성자(함수) 만들기
#include <iostream>
class Dog {
private:
	int age;
public:
	Dog() {
	// 생성자는 class 이름과 똑같은 것
	}
	int getAge() {
		return age;

	}
	void setAge(int a) {
		age = a;
	}
};
int main()
{
	Dog coco;
	COCO.setAge(3);
	std::cout << coco.getAge();

	return 0;
}

8단계 생성자를 자동으로 호출되게 해서 1 출력되게 하기
#include <iostream>
class Dog {
private:
	int age;
public:
	Dog() {	// 생성자는 class 이름과 똑같은 것
		age = 1;
	}
	int getAge() {
		return age;

	}
	void setAge(int a) {
		age = a;
	}
};
int main()
{
	Dog coco;
//	COCO.setAge(3);
	std::cout << coco.getAge();

	return 0;
}

9단계 생성자 한개 더 추가
#include <iostream>
class Dog {
private:
	int age;
public:
	Dog() {	// 생성자는 class 이름과 똑같은 것
		age = 1;
	}
	Dog(int a) {
		age = a;
	}
	int getAge() {
		return age;

	}
	void setAge(int a) {
		age = a;
	}
};
int main()
{
	Dog coco;
//	COCO.setAge(3);
	std::cout << coco.getAge();

	return 0;
}

10단계 매개변수의 값을 넣지 않고 coco와 happy의 나이 1살로 출력
#include <iostream>
class Dog {
private:
	int age;
public:
	Dog() {	// 생성자는 class 이름과 똑같은 것
		age = 1;
	}
	Dog(int a) {
		age = a;
	}
	int getAge() {
		return age;

	}
	void setAge(int a) {
		age = a;
	}
};
int main()
{
	Dog coco,happy;
//	COCO.setAge(3);
	std::cout << coco.getAge()<<std::endl;
	std::cout << happy.getAge() << std::endl;
	return 0;
}

11단계 happy의 나이를 5살로 출력
생성자 함수 중첩을 하는 코드 완성

#include <iostream>  // 입출력 스트림을 사용하기 위한 헤더 파일 포함

class Dog {  // Dog 클래스 정의
private:
    int age;  // 개의 나이를 저장하는 private 멤버 변수

public:
    // 기본 생성자: 매개변수 없이 객체 생성 시 호출됨
    Dog() {
        age = 1;  // 기본 나이를 1로 설정
    }

    // 매개변수가 있는 생성자: 나이를 지정하여 객체 생성 시 호출됨
    Dog(int a) {
        age = a;  // 지정된 나이로 설정
    }

    // age 값을 반환하는 getter 함수
    int getAge() {
        return age;
    }

    // age 값을 설정하는 setter 함수
    void setAge(int a) {
        age = a;
    }
};

int main()
{
    Dog coco;  // 기본 생성자를 사용하여 coco 객체 생성 (나이는 1로 초기화)
    Dog happy(5);  // 매개변수가 있는 생성자를 사용하여 happy 객체 생성 (나이는 5로 초기화)

    // coco.setAge(3);  // 이 줄은 주석 처리되어 있어 실행되지 않음

    // coco의 나이 출력 (기본 생성자에 의해 1)
    std::cout << coco.getAge() << std::endl;

    // happy의 나이 출력 (생성 시 지정한5)
    std::cout << happy.getAge() << std::endl;

    return 0;
}

12단계 추가 소멸자 추가
객체가 사라지면서 호출하는 것이라 한개만 만들 수 있다
#include <iostream>
class Dog {
private:
	int age;
public:
	Dog() {age = 1;}
	Dog(int a) {age = a;}
	~Dog() {std::cout << "bye~~\n";}
	int getAge() {return age;}
	void setAge(int a) {age = a;}
};
int main()
{
	Dog coco,happy(5);
//	COCO.setAge(3);
	std::cout << coco.getAge()<<std::endl;
	std::cout << happy.getAge() << std::endl;
	return 0;
}

13단계 class 밖으로 빼기
선언 전까지
#include <iostream>
class Dog {
private:
	int age;
public:
	Dog() {age = 1;}
	Dog(int a) {age = a;}
	~Dog() {std::cout << "bye~~\n";}
	int getAge() {return age;}
	void setAge(int a) {age = a;}
};

Dog::Dog() { age = 1; }
Dog::Dog(int a) { age = a; }
Dog::~Dog() { std::cout << "bye~~\n"; }
int Dog::getAge() { return age; }
void Dog::setAge(int a) { age = a; }

int main()
{
	Dog coco,happy(5);
//	COCO.setAge(3);
	std::cout << coco.getAge()<<std::endl;
	std::cout << happy.getAge() << std::endl;
	return 0;
}

14단계 선언까지
class 안에서는 선언만 하고 밖에서 정의를 하도록
#include <iostream>
class Dog {
private:
	int age;
public:
	Dog();
	Dog(int a);
	~Dog();
	int getAge();
	void setAge(int a);
};

Dog::Dog() { age = 1; }
Dog::Dog(int a) { age = a; }
Dog::~Dog() { std::cout << "bye~~\n"; }
int Dog::getAge() { return age; }
void Dog::setAge(int a) { age = a; }

int main()
{
	Dog coco, happy(5);
	//	COCO.setAge(3);
	std::cout << coco.getAge() << std::endl;
	std::cout << happy.getAge() << std::endl;
	return 0;
}

14단계 코드 주석을 달아서 설명
#include <iostream>  // 입출력 스트림을 사용하기 위한 헤더 파일 포함

class Dog {  // Dog 클래스 선언
private:
    int age;  // 개의 나이를 저장하는 private 멤버 변수

public:
    Dog();  // 기본 생성자 선언
    Dog(int a);  // 매개변수가 있는 생성자 선언
    ~Dog();  // 소멸자 선언
    int getAge();  // age를 반환하는 getter 함수 선언
    void setAge(int a);  // age를 설정하는 setter 함수 선언
};

// 클래스 외부에서 멤버 함수들의 정의

Dog::Dog() { age = 1; }  // 기본 생성자 정의: 나이를 1로 초기화

Dog::Dog(int a) { age = a; }  // 매개변수가 있는 생성자 정의: 지정된 나이로 초기화

Dog::~Dog() { std::cout << "bye~~\n"; }  // 소멸자 정의: 객체가 소멸될 때 메시지 출력

int Dog::getAge() { return age; }  // getter 함수 정의: age 값 반환

void Dog::setAge(int a) { age = a; }  // setter 함수 정의: age 값 설정

int main()
{
    Dog coco;  // 기본 생성자를 사용하여 coco 객체 생성 (나이는 1로 초기화)
    Dog happy(5);  // 매개변수가 있는 생성자를 사용하여 happy 객체 생성 (나이는 5로 초기화)

    // coco.setAge(3);  // 이 줄은 주석 처리되어 있어 실행되지 않음

    // coco의 나이 출력 (기본 생성자에 의해 1)
    std::cout << coco.getAge() << std::endl;

    // happy의 나이 출력 (생성 시 지정한 5)
    std::cout << happy.getAge() << std::endl;

    return 0;
}  // main 함수가 끝나면 coco와 happy 객체가 소멸되며, 각각 소멸자가 호출됨

출력결과
1
5
bye~~
bye~~
실습 6-5: 생성자 중첩 예
#include <iostream>
using std::cout;
using std::endl;
class Dog{
private:
int age;
public:
Dog() {age=1;}
// 매개변수가 없는 생성자
Dog(int a){age=a;}
// 매개변수가 하나인 생성자
~Dog();
int getAge();
void setAge(int a);
};
Dog::~Dog()
{
std::cout<<"소멸\n";
}
int Dog::getAge()
{
return age;
}
void Dog::setAge(int a)
{
age=a;
}
int main()
{
Dog happy[5];
Dog meri[5]={1,2,3,4,5};
for(int i=0;i<5;i++)
std::cout<<happy[i].getAge()<<
","<<meri[i].getAge()<<std::endl;
return 0;
}
출력결과
1,1
1,2
1,3
1,4
1,5
소멸
소멸
소멸
소멸
소멸
소멸
소멸
소멸
소멸
소멸실습 6-7: 디폴트 인자
#include int add(int i , int j ) // 형식매개변수 i,j는 디폴트 인자
// I에 값을 넣으면 ex)int I =1 오른쪽에도 값을 줘야 실행되지만,
// j에 값을 넣으면 실행이 된다
{
return(i+j);
}
int main()
{
std::cout< std::cout< std::cout< return 0;
}// 실습 6-7 디폴트 인자
// 시험에 많이 나옴
// 선언부에만 디폴트 값을 쓰고 정의부에는 작성x
#include int add(int i = 1, int j = 2); // 선언부에 작성
int main()
{
std::cout << add() << ","; // 실매개변수 없음, 3
std::cout << add(10) << ","; // 실매개변수 한 개, 12
std::cout << add(10, 20); // 실매개변수 두개, 30
return 0;
}
int add(int i, int j)// 정의부에는 작성하지 않음
{
return(i + j);
}위의 생성자 함수 중첩에 디폴트 인자를 갖는 생성자를 추가하고
#include <iostream>
class Dog {
private:
int age;
public:
Dog(int a=1){age = a;}
// Dog();
// Dog(int a);
~Dog();
int getAge();
void setAge(int a);
};
//Dog::Dog() { age = 1; }
//Dog::Dog(int a) { age = a; }
Dog::~Dog() { std::cout << "bye~~\n"; }
int Dog::getAge() { return age; }
void Dog::setAge(int a) { age = a; }
int main()
{
Dog coco, happy(5);
// COCO.setAge(3);
std::cout << coco.getAge() << std::endl;
std::cout << happy.getAge() << std::endl;
return 0;
}
class 밖으로 빼기
#include <iostream>
class Dog {
private:
int age;
public:
Dog(int a=1);
// Dog();
// Dog(int a);
~Dog();
int getAge();
void setAge(int a);
};
Dog::Dog(int a){
age = a;
}
//Dog::Dog() { age = 1; }
//Dog::Dog(int a) { age = a; }
Dog::~Dog() { std::cout << "bye~~\n"; }
int Dog::getAge() { return age; }
void Dog::setAge(int a) { age = a; }
int main()
{
Dog coco, happy(5);
// COCO.setAge(3);
std::cout << coco.getAge() << std::endl;
std::cout << happy.getAge() << std::endl;
return 0;
}
출력결과
1
5
bye~~
bye~~// 실습 6 - 8: 디폴트 인자를 갖는 생성자
#include <iostream>
class Dog {
private:
int age;
public:
Dog(int a = 1) { age = a; }
// 디폴트 매개변수를 갖는 생성자
~Dog();
int getAge();
void setAge(int a);
};
Dog::~Dog()
{
std::cout << "소멸\n";
}
int Dog::getAge()
{
return age;
}
void Dog::setAge(int a)
{
age = a;
}
int main()
{
Dog meri, happy(5);
std::cout << happy.getAge() << "," <<
meri.getAge() << std::endl;
return 0;
}
출력결과
5.1
소멸
소멸//실습 6 - 9: 디폴트 인자 응용
// 2개에서 4개의 정수형 매개변수를 입력받아 그 곱(합)한 결과를 출력할 수 있는 Gop()(Hap()) 이라는
//함수를 디폴트 인자를 이용하여 구현
#include <iostream>
int Gop(int i, int j, int k = 1, int l = 1)
{
return(i * j * k * l);
}
int main()
{
std::cout << Gop(1, 2) << std::endl; // 1*2*1*1
std::cout << Gop(1, 2, 3) << std::endl; // 1*2*3*1
std::cout << Gop(1, 2, 3, 4) << std::endl;// 1*2*3*4
return 0;
}
int Hap(int i, int j, int k = 0, int l = 0)
{
return(i + j + k + l);
}이름까지 저장할 수 있는 calss 만들기
1단계
#include <iostream>
#include <stdio.h>
class Dog {
private:
int age;
std::string name;
public:
int getAge() {return age;}
void setAge(int a) {age = a;}
};
int main()
{
return 0;
}
2단계 this 추가
#include <iostream>
#include <stdio.h>
class Dog {
private:
int age;
std::string name;
public:
int getAge() {return age;}
void setAge(int a) {this -> age = age;}
};
int main()
{
return 0;
}
3단계 getname getname 추가
#include <iostream>
#include <stdio.h>
// include <string>
class Dog {
private:
int age;
std::string name;
public:
int getAge() {return age;}
void setAge(int a) {this -> age = age;}
std::string getName() {return name;}
void setName(std::string n) { this -> name = name; }
};
int main()
{
Dog coco;
coco.setName("코코");
coco.setAge(1);
std::cout << coco.getName() << coco.getAge();
return 0;
}
4단계 생성자 추가 코코가 출력 안됨 수정
#include <iostream>
#include <stdio.h>
class Dog {
private:
int age;
std::string name;
public:
Dog() {
age = 1;
name = "강아지";
}
int getAge() {return age;}
void setAge(int a) {this -> age = age;}
std::string getName() {return name;}
void setName(std::string n) { this -> name = name; }
};
int main()
{
Dog coco,happy;
std::cout << coco.getName() << coco.getAge() << std::endl;
std::cout << happy.getName() << happy.getAge() << std::endl;
coco.setName("코코");
coco.setAge(3);
std::cout << coco.getName() << coco.getAge()<< std::endl;
return 0;
}
5단계 생성자 추가 코코가 출력이 안됨 수정
#include <iostream>
#include <stdio.h>
class Dog {
private:
int age;
std::string name;
public:
Dog() {
age = 1;
name = "강아지";
}
Dog(int a, std::string n) {
age = a;
name = n;
}
int getAge() {return age;}
void setAge(int age) {this -> age = age;}
std::string getName() {return name;}
void setName(std::string name) { this -> name = name; }
};
int main()
{
Dog coco,happy(3, "해피");
std::cout << coco.getName() << coco.getAge() << std::endl;
std::cout << happy.getName() << happy.getAge() << std::endl;
coco.setName("코코");
coco.setAge(3);
std::cout << coco.getName() << coco.getAge()<< std::endl;
return 0;
}
6단계 생성자 2개를 디폴트 인자를 사용해서 1개로 합치기
#include <iostream>
#include <stdio.h>
// include <string>
class Dog {
private:
int age;
std::string name;
public:
//Dog() {
// age = 1;
// name = "강아지";
//}
Dog(int a=1, std::string n="강아지") {
age = a;
name = n;
}
int getAge() {return age;}
void setAge(int age) {this -> age = age;}
std::string getName() {return name;}
void setName(std::string name) { this -> name = name; }
};
int main()
{
Dog coco,happy(3, "해피");
std::cout << coco.getName() << coco.getAge() << std::endl;
std::cout << happy.getName() << happy.getAge() << std::endl;
coco.setName("코코");
coco.setAge(3);
std::cout << coco.getName() << coco.getAge()<< std::endl;
return 0;
}
7단계this 포인터 사용
#include <iostream>
#include <stdio.h>
// include <string>
class Dog {
private:
int age;
std::string name;
public:
//Dog() {
// age = 1;
// name = "강아지";
//}
Dog(int age=1, std::string name="강아지") {
this -> age = age;
this -> name = name;
}
int getAge() {return age;}
void setAge(int age) {this -> age = age;}
std::string getName() {return name;}
void setName(std::string name) { this -> name = name; }
};
int main()
{
Dog coco,happy(3, "해피");
std::cout << coco.getName() << coco.getAge() << std::endl;
std::cout << happy.getName() << happy.getAge() << std::endl;
coco.setName("코코");
coco.setAge(3);
std::cout << coco.getName() << coco.getAge()<< std::endl;
return 0;
}
8단계 const함수 추가
#include <iostream>
#include <stdio.h>
// include <string>
class Dog {
private:
int age;
std::string name;
public:
//Dog() {
// age = 1;
// name = "강아지";
//}
Dog(int age=1, std::string name="강아지") {
this->age = age;
this->name = name;
}
int getAge() const {return age;}
void setAge(int age) {this->age = age;}
std::string getName() {return name;}
void setName(std::string name) { this->name = name;}
};
int main()
{
Dog coco,happy(3, "해피");
std::cout << coco.getName() << coco.getAge() << std::endl;
std::cout << happy.getName() << happy.getAge() << std::endl;
coco.setName("코코");
coco.setAge(3);
std::cout << coco.getName() << coco.getAge()<< std::endl;
return 0;
}
9단계 class 밖으로 빼기
#include <iostream>
#include <stdio.h>
// include <string>
class Dog {
private:
int age;
std::string name;
public:
//Dog() {
// age = 1;
// name = "강아지";
//}
Dog(int age=1, std::string name="강아지") {
this->age = age;
this->name = name;
}
int getAge() const;
void setAge(int a);
std::string getName() const;
void setName(std::string n);
};
int getAge() const { return age; }
void setAge(int age) { this->age = age; }
std::string getName() { return name; }
void setName(std::string name) { this->name = name; }
int main()
{
Dog coco,happy(3, "해피");
std::cout << coco.getName() << coco.getAge() << std::endl;
std::cout << happy.getName() << happy.getAge() << std::endl;
coco.setName("코코");
coco.setAge(3);
std::cout << coco.getName() << coco.getAge()<< std::endl;
return 0;
}
10단계 생성자 밖으로 빼기
#include <iostream>
#include <stdio.h>
// include <string>
class Dog {
private:
int age;
std::string name;
public:
//Dog() {
// age = 1;
// name = "강아지";
//}
Dog(int age = 1, std::string name = "강아지");
int getAge() const;
void setAge(int a);
std::string getName() const;
void setName(std::string n);
};
Dog::Dog(int age, std::string name) {
this->age = age;
this->name = name;
}
int Dog::getAge() const { return age; }
void Dog::setAge(int age) { this->age = age; }
std::string Dog::getName()const { return name; }
void Dog::setName(std::string name) { this->name = name; }
int main()
{
Dog coco,happy(3, "해피");
std::cout << coco.getName() << coco.getAge() << std::endl;
std::cout << happy.getName() << happy.getAge() << std::endl;
coco.setName("코코");
coco.setAge(3);
std::cout << coco.getName() << coco.getAge()<< std::endl;
return 0;
}
// 캡슐화가 되어 있어서 main함수 위쪽으로는 소스를 재활용하거나 다시 사용 가능하다.'C++프로그래밍 > 수업 내용 및 수업 후 과제' 카테고리의 다른 글
| C++ 13주차 수업 내용 및 수업 후 과제 (1) | 2024.11.26 |
|---|---|
| C++ 12주차 수업 내용 및 수업 후 과제 (1) | 2024.11.19 |
| c++ 수업 내용 및 수업 후 과제 (3) | 2024.11.05 |
| c++ 9주차 수업 내용 및 수업 후 과제 (0) | 2024.10.29 |
| C++ 7주차 수업 내용 및 수업 후 과제 (0) | 2024.10.15 |
- 디폴트 매개변수
- int add(int, int); //매개변수 2개
- C++에서는 함수를 호출할 때 별도의 매개변수를 전달하지 않아도 기본적인 값을
전달하도록 함수 원형을 선언할 때 디폴트 값을 지정할 수 있다.
- 해당 매개변수가 주어지지 않으면 디폴트 인자 값이 할당된다.
- 모든 매개변수에 디폴트 값을 줄 필요는 없으며 필요한 곳에만 준다.
- 디폴트 매개변수의 사용은 함수 중첩의 축약형이다.
- 디폴트 매개변수를 갖는 함수를 만들 때, main()함수 전에 함수 선언을 하면 선언부에만
디폴트 인자를 지정해야 한다.
int add(int i=1, int j=2);// 선언부에 디폴트 인자 작성
일단 디폴트 매개변수를 정의하기 시작하면 그 다음(오른쪽)의 매개변수들은 모두 디폴트
매개변수를 가져야 한다.
int add(int i=1, int j);//오류