Javascript 9일차 이벤트/
2025. 12. 30. 16:37ㆍ대우개발원 수업 내용/Javascript
반응형
내용정리
더보기
12.6 이벤트 다루기
1. 이벤트 종류
- 마우스 이벤트
onclick : 마우스로 클릭하면 발생
ondblclick : 마우스로 두 번 빠르게 클릭하면 발생
onmouseover : 마우스 포인터를 올리면 발생
onmouseout : 마우스 포인터가 빠져나가면 발생
onmousemove : 마우스 포인터가 움직이면 발생
onwheel : 마우스 휠(wheel)을 움직이면 발생 - 키보드 이벤트
onkeypress : 키보드 버튼을 누르고 있는 동안 발생
onkeydown : 키보드 버튼을 누른 순간 발생
onkeyup : 키보드 버튼을 눌렀다가 뗀 순간 발생 - 포커스 이벤트
onfocus : 요소에 포커스가 되면 발생
onblur : 요소가 포커스를 잃으면 발생 - 폼 이벤트
onsubmit : 폼이 전송될 때 발생 - 리소스 이벤트
onload : 웹 브라우저의 리소스 로드가 끝나면 발생
2. 이벤트 등록하기
- 이벤트 등록 : 이벤트가 발생할 때 어떤 작업을 할지 자바스크립트 코드로 작성하는 것
- 이벤트 등록 방법
인라인 : HTML 태그에 속성으로 이벤트 등록
프로퍼티 리스너 : 요소 노드에 직접 속성으로 이벤트 등록
이벤트 등록 메서드 : addEventListener() 메서드로 이벤트 등록
12.7 이벤트 객체와 this
1. 이벤트 객체 사용하기
- 이벤트 객체 : 이벤트 함수가 호출될 때 내부적으로 전달되는 이벤트 정보가 담긴 객체
- PointerEvent 객체의 주요 속성
clientX : 마우스가 클릭된 x좌표(수평 스크롤 포함 X)
clientY : 마우스가 클릭된 y좌표(수직 스크롤 포함 X)
pageX : 마우스가 클릭된 x좌표(수평 스크롤 포함 O)
pageY : 마우스가 클릭된 y좌표(수직 스크롤 포함 O)
screenX : 모니터의 왼쪽 위 모서리를 기준으로 마우스가 클릭된 x좌표
screenY : 모니터의 왼쪽 위 모서리를 기준으로 마우스가 클릭된 y좌표 - KeyboardEvent 객체의 주요 속성
keyCode : 키보드에서 눌린 키의 유니코드 값 반환
ctrlKey : Ctrl 키가 눌렸으면 true, 그렇지 않으면 false 반환
altKey : Alt 키가 눌렸으면 true, 그렇지 않으면 false 반환
shiftKey : Shift 키가 눌렸으면 true, 그렇지 않으면 false 반환
2. 이벤트 취소하기
- preventDefault() 메서드 : 태그에 적용된 기본 이벤트를 취소
3. this 키워드 사용하기
- this 키워드 : 이벤트를 발생시킨 요소 노드를 가리킴
- 화살표 함수일 때는 이벤트 객체의 target 속성으로 참조해야 함
마우스 관련 이벤트 객체
더보기
http://localhost:52330/js9/event_object.html
<!DOCTYPE html>
<html lang="en">
<head>
<meta charset="UTF-8">
<meta name="viewport" content="width=device-width, initial-scale=1.0">
<title>event object</title>
</head>
<body>
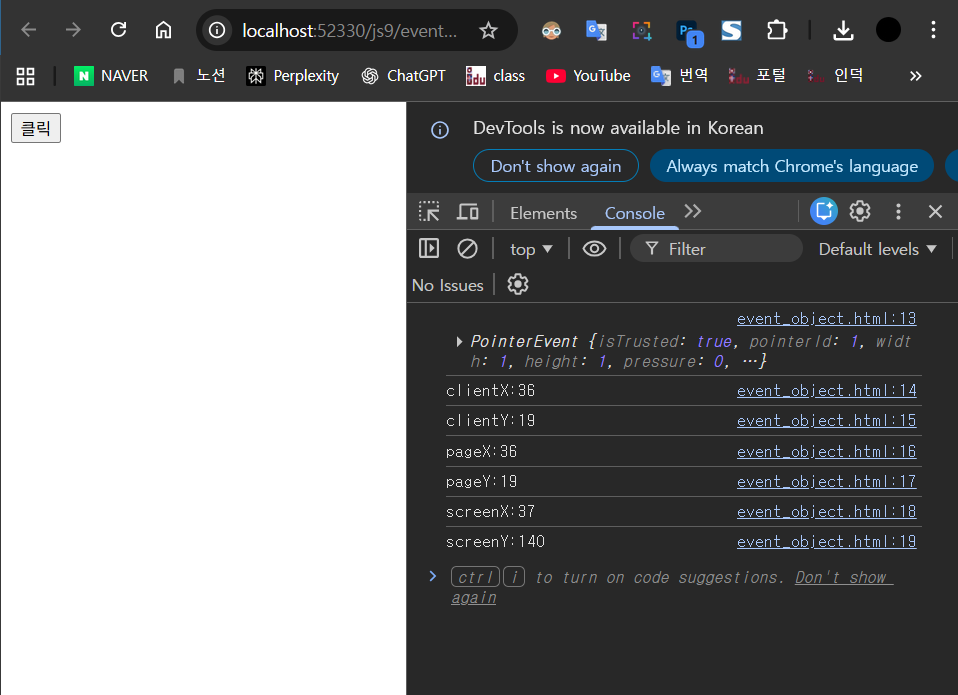
<button>클릭</button>
<script>
const btnEl = document.querySelector("button");
btnEl.addEventListener("click",function(event){ // 이벤트 객체
console.log(event);
console.log(`clientX:${event.clientX}`);
console.log(`clientY:${event.clientY}`);
console.log(`pageX:${event.pageX}`);
console.log(`pageY:${event.pageY}`);
console.log(`screenX:${event.screenX}`);
console.log(`screenY:${event.screenY}`);
})
</script>
</body>
</html>키보드 키 코드
더보기
http://localhost:52330/js9/event_object.html
<!DOCTYPE html>
<html lang="en">
<head>
<meta charset="UTF-8">
<meta name="viewport" content="width=device-width, initial-scale=1.0">
<title>event object</title>
</head>
<body>
<button>클릭</button>
<form>
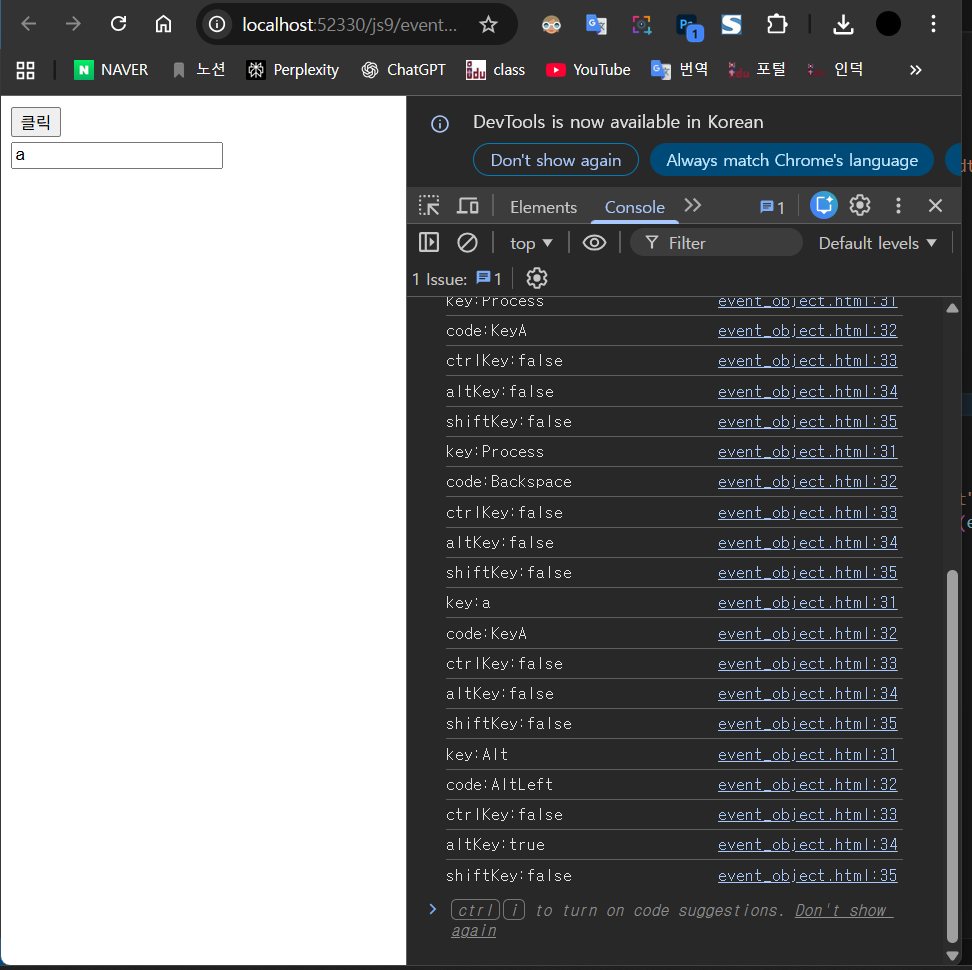
<input type="text">
</form>
<script>
const btnEl = document.querySelector("button");
btnEl.addEventListener("click", function(event) {
console.log(event);
console.log(`clientX:${event.clientX}`);
console.log(`clientY:${event.clientY}`);
console.log(`pageX:${event.pageX}`);
console.log(`pageY:${event.pageY}`);
console.log(`screenX:${event.screenX}`);
console.log(`screenY:${event.screenY}`);
});
</script>
<script>
const inputEl = document.querySelector("input");
inputEl.addEventListener("keydown", function(event) {
console.log(`key:${event.key}`);
console.log(`code:${event.code}`);
console.log(`ctrlKey:${event.ctrlKey}`);
console.log(`altKey:${event.altKey}`);
console.log(`shiftKey:${event.shiftKey}`);
});
</script>
</body>
</html>이벤트 취소하기
더보기

http://localhost:52330/js9/event_object.html
<!DOCTYPE html>
<html lang="en">
<head>
  <meta charset="UTF-8">
  <meta name="viewport" content="width=device-width, initial-scale=1.0">
  <title>event object</title>
</head>
<body>
  <button>클릭</button>

  <form>
    <input type="text">
  </form>

  <a href="https://www.naver.com">네이버 이동</a>
  <a href="https://www.daum.net">다음 이동</a>

  <script>
    const aELs = document.querySelectorAll("a");
    console.log(typeof(aELs));
    for(let i = 0; i < aELs.length; i++){
      aELs[i].addEventListener("click",function(event){
        //기본이벤트 취소 function(e)라고 쓰고 e.preventDefault();써도 된다다
        event.preventDefault();
      });
    }
  </script>

  <script>
    const btnEl = document.querySelector("button");
    btnEl.addEventListener("click", function(event) {
      console.log(event);
      console.log(`clientX:${event.clientX}`);
      console.log(`clientY:${event.clientY}`);
      console.log(`pageX:${event.pageX}`);
      console.log(`pageY:${event.pageY}`);
      console.log(`screenX:${event.screenX}`);
      console.log(`screenY:${event.screenY}`);
    });
  </script>

  <script>
    const inputEl = document.querySelector("input");
    inputEl.addEventListener("keydown", function(event) {
      console.log(`key:${event.key}`);
      console.log(`code:${event.code}`);
      console.log(`ctrlKey:${event.ctrlKey}`);
      console.log(`altKey:${event.altKey}`);
      console.log(`shiftKey:${event.shiftKey}`);
    });
  </script>

</body>
</html>
this속성
더보기

http://localhost:52330/js9/thisd.html
<!DOCTYPE html>
<html lang="en">
<head>
  <meta charset="UTF-8">
  <meta name="viewport" content="width=device-width, initial-scale=1.0">
  <title>this</title>
</head>
<body>
  <p>text-1</p>
  <p>text-2</p>
  <p>text-3</p>
  <script>
    const pEls = document.querySelectorAll("p");
    pEls.forEach((el) => {
      // el.addEventListener("click",function(){
        el.addEventListener("click", (e) => {
        console.log(this);
        console.log(e.target);
        // if(this.style.color === "red"){
        //   this.style.color = "black";
        // }else{
        //   this.style.color = "red";
        // }
      });
    })
  </script>
</body>
</html>
toDO
더보기

http://localhost:52330/js9/toDO.html
<!DOCTYPE html>
<html lang="en">
<head>
<meta charset="UTF-8">
<meta name="viewport" content="width=device-width, initial-scale=1.0">
<title>toDO</title>
<style>
ul {
list-style: none;
}
li {
font-size: 20px;
line-height: 35px;
}
.check {
color: #ccc;
font-size: 20px;
margin-right: 25px;
}
.check:hover {
color: #222;
}
.done {
text-Decoration : line-through;
color: gray;
}
</style>
</head>
<body>
<h1>할일 목록</h1>
<ul>
<li><p><span class="check">✓</span><span class="txt">할일 1</span></p></li>
<li><p><span class="check">✓</span><span class="txt">할일 2</span></p></li>
<li><p><span class="check">✓</span><span class="txt">할일 3</span></p></li>
<li><p><span class="check">✓</span><span class="txt">할일 4</span></p></li>
<li><p><span class="check">✓</span><span class="txt">할일 5</span></p></li>
</ul>
<script>
let checks = document.querySelectorAll(".check");
for(var i = 0; i < checks.length; i++){
checks[i].addEventListener("click",function(){
this.parentNode.style.color = "#eee"
this.parentNode.style.textDecoration="line-through"
})
}
</script>
</body>
</html>
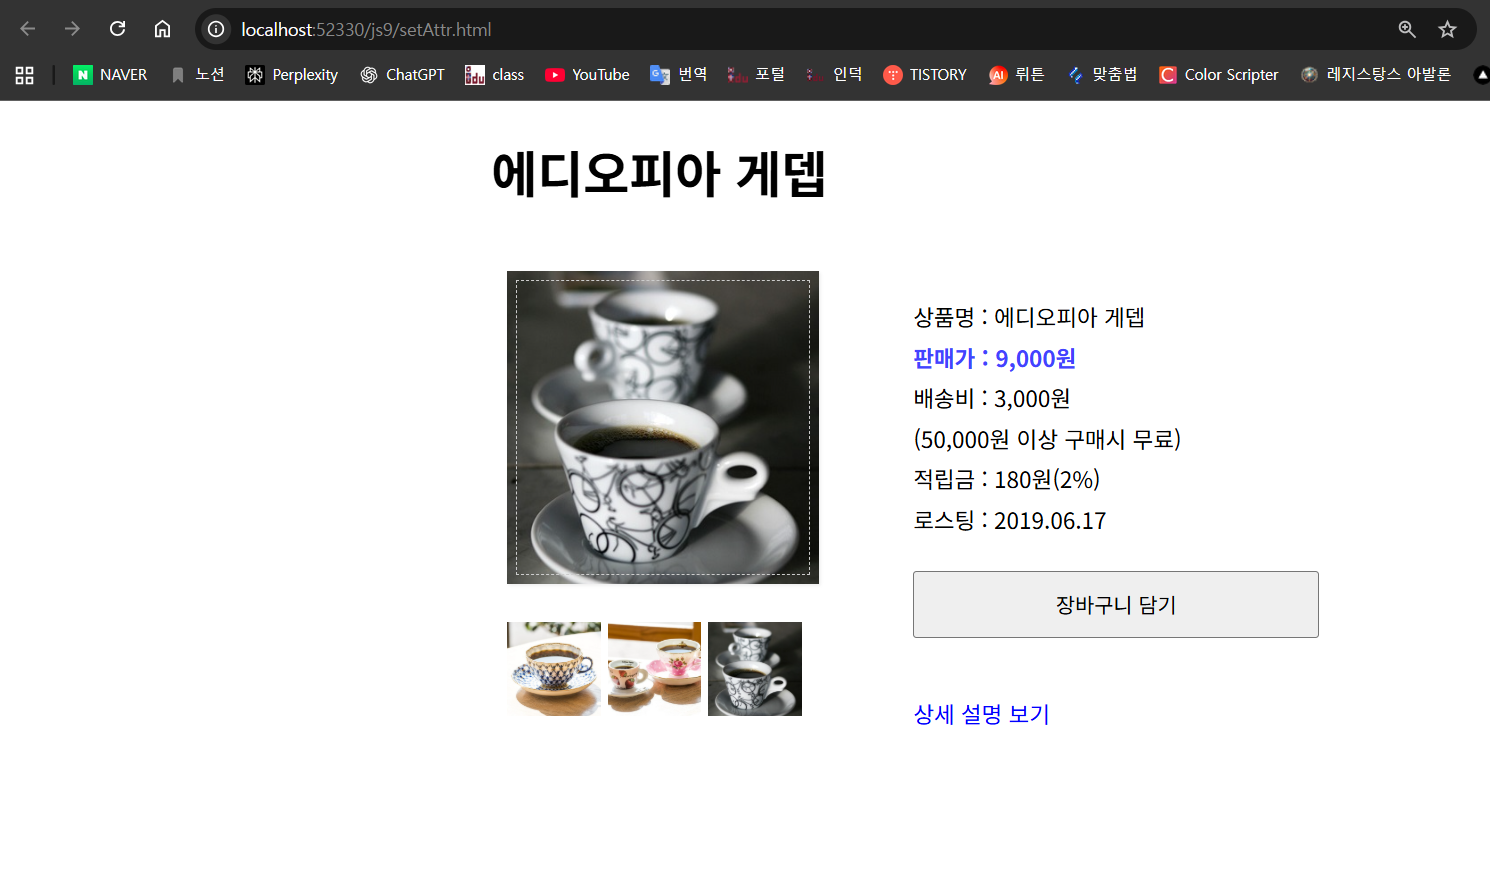
1) DOM(Document Object Model) 조작
HTML 문서에 있는 요소를 자바스크립트로 “선택해서” 다룹니다.
- document.querySelector("#cup")
id가 cup인 대표 이미지 요소를 선택 - document.querySelectorAll(".small")
class가 small인 썸네일 이미지들을 여러 개(NodeList) 선택
2) 이벤트 처리(Event Handling)
각 썸네일 이미지에 클릭 이벤트를 등록합니다.
- addEventListener("click", changePic);
썸네일을 클릭하면 changePic 함수가 실행되도록 연결
3) this 키워드 활용
이벤트 핸들러 함수에서 this는 이벤트가 발생한 요소(클릭한 썸네일 이미지) 를 의미합니다.
- this.src
클릭한 썸네일의 이미지 경로를 가져옴
4) setAttribute()로 속성 변경
대표 이미지의 src 속성을 클릭한 썸네일의 src로 바꿉니다.
- cup.setAttribute("src", newPic);
대표 이미지가 썸네일 이미지로 변경됨
하는 코드
더보기
http://localhost:52330/js9/setAttr.html
html
<!DOCTYPE html>
<html lang="ko">
<head>
	<meta charset="UTF-8">
	<meta name="viewport" content="width=device-width, initial-scale=1.0">
	<meta http-equiv="X-UA-Compatible" content="ie=edge">
	<title>DOM</title>
	<link rel="stylesheet" href="/css/setAttr.css">
</head>
<body>
	<div id="container">
			<h1 id="heading">에디오피아 게뎁</h1>
			<div id="prod-pic">
				<img src="/images/coffee-pink.jpg" alt="에디오피아 게뎁" id="cup" width="200" height="200">
					<div id="small-pic">
						<img src="/images/coffee-blue.jpg" class="small">
						<img src="/images/coffee-pink.jpg" class="small">
						<img src="/images/coffee-gray.jpg" class="small">
					</div>
			</div>
			<div id="desc">
				<ul>
					<li>상품명 : 에디오피아 게뎁</li>
					<li class="bluetext">판매가 : 9,000원</li>
					<li>배송비 : 3,000원<br>(50,000원 이상 구매시 무료)</li>
					<li>적립금 : 180원(2%)</li>
					<li>로스팅 : 2019.06.17</li>
					<button>장바구니 담기</button>
				</ul>
				<a href="#" id="view">상세 설명 보기</a>

			</div>
	</div>

  <script>
    var cup = document.querySelector("#cup");
    var smallPics = document.querySelectorAll(".small");

    for(let i = 0; i < smallPics.length; i++) {
      smallPics[i].addEventListener("click", changePic);
    }
    function changePic() {
      var newPic = this.src;
      cup.setAttribute("src", newPic);

    }
  </script>
</body>
</html>
css
#container {
  width:600px;
  margin:0 auto;
}
#prod-pic, #desc {
  float:left;
}
#prod-pic {
  margin:20px 20px auto 10px;
  padding:0;
}
#cup {
  box-shadow:1px 1px 2px #eee;
  outline:1px dashed #ccc;
  outline-offset: -7px;
}
#small-pic {
  margin-top:20px;
  /* list-style: none; */
  padding:0;
}
/* #small-pic > li {
  float:left;
  margin-right:10px;
} */
.small {
  width:60px;
  height:60px;
}
#small-pic img:hover {
  cursor:pointer;
}
#desc {
  width:300px;
  padding-top:20px;
  margin-bottom:50px;
}
.bluetext {
  color:#4343ff;
  font-weight:bold;
}
#desc button {
  margin-top:20px;
  margin-bottom:20px;
  width:100%;
  padding:10px;
}
#desc ul {
  list-style:none;
}
#desc li{
  font-size:0.9em;
  line-height:1.8;
}
#desc a {
  text-decoration: none;
  font-size:0.9em;
  color:blue;
  padding-left:40px;
}

h1 {
  font-size:2em;
}
h2 {
  font-size:1.5em;
  color:#bebebe;
  font-weight:normal;
}
h3 {
  font-size:1.1em;
  color:#222;
}
p {
  font-size:0.9em;
  line-height:1.4;
  text-align: justify;
}
상세정보 닫기
더보기

http://localhost:52330/js9/setAttr.html#
<!DOCTYPE html>
<html lang="ko">
<head>
	<meta charset="UTF-8">
	<meta name="viewport" content="width=device-width, initial-scale=1.0">
	<meta http-equiv="X-UA-Compatible" content="ie=edge">
	<title>DOM</title>
	<link rel="stylesheet" href="/css/setAttr.css">
</head>
<body>
	<div id="container">
		<h1 id="heading">에디오피아 게뎁</h1>
		<div id="prod-pic">
			<img src="/images/coffee-pink.jpg" alt="에디오피아 게뎁" id="cup" width="200" height="200">
				<div id="small-pic">
					<img src="/images/coffee-pink.jpg" class="small">
					<img src="/images/coffee-blue.jpg" class="small">
					<img src="/images/coffee-gray.jpg" class="small">
				</div>
		</div>
		<div id="desc">
			<ul>
				<li>상품명 : 에디오피아 게뎁</li>
				<li class="bluetext">판매가 : 9,000원</li>
				<li>배송비 : 3,000원<br>(50,000원 이상 구매시 무료)</li>
				<li>적립금 : 180원(2%)</li>
				<li>로스팅 : 2019.06.17</li>
				<button>장바구니 담기</button>
			</ul>
			<a href="#" id="view">상세 설명 보기</a>
			<a href="#" id="close">상세 설명 닫기</a>
		</div>
		<div id="detail">
			<hr>
			<h2>상품 상세 정보</h2>
			<ul>
				<li>원산지 : 에디오피아</li>
				<li>지 역 : 이르가체프 코체레</li>
				<li>농 장 : 게뎁</li>
				<li>고 도 : 1,950 ~ 2,000 m</li>
				<li>품 종 : 지역 토착종</li>
				<li>가공법 : 워시드</li>
			</ul>
			<h3>Information</h3>
			<p>2차 세계대전 이후 설립된 게뎁농장은 유기농 인증 농장으로 여성의 고용 창출과 지역사회 발전에 기여하며 3대째 이어져 내려오는 오랜 역사를 가진 농장입니다. 게뎁 농장은 SCAA 인증을 받은 커피 품질관리 실험실을 갖추고 있어 철처한 관리를 통해 스페셜티커피를 생산합니다.</p>
			<h3>Flavor Note</h3>
			<p>은은하고 다채로운 꽃향, 망고, 다크 체리, 달달함이 입안 가득.</p>
		</div>

	</div>

	<script>
		var cup = document.querySelector("#cup");
		var smallPics = document.querySelectorAll(".small");

		for(let i = 0; i < smallPics.length; i++) {
      smallPics[i].addEventListener("click", changePic);
    }

		function changePic() {
			var newPic = this.src;
			cup.setAttribute("src", newPic);
		}

		var view = document.querySelector("#view");
		var close = document.querySelector("#close");
		var detail = document.querySelector("#detail");
		view.addEventListener("click", function(){
			detail.style.display = "block"
			close.style.display = "inline"
		})
		close.addEventListener("click", function(){
			detail.style.display = "none"
			this.style.display = "none"
		})


	</script>
</body>
</html>
#container {
width:600px;
margin:0 auto;
}
#prod-pic, #desc {
float:left;
}
#prod-pic {
margin:20px 20px auto 10px;
padding:0;
}
#cup {
box-shadow:1px 1px 2px #eee;
outline:1px dashed #ccc;
outline-offset: -7px;
}
#small-pic {
margin-top:20px;
/* list-style: none; */
padding:0;
}
/* #small-pic > li {
float:left;
margin-right:10px;
} */
.small {
width:60px;
height:60px;
}
#small-pic img:hover {
cursor:pointer;
}
#desc {
width:300px;
padding-top:20px;
margin-bottom:50px;
}
.bluetext {
color:#4343ff;
font-weight:bold;
}
#desc button {
margin-top:20px;
margin-bottom:20px;
width:100%;
padding:10px;
}
#desc ul {
list-style:none;
}
#desc li{
font-size:0.9em;
line-height:1.8;
}
#desc a {
text-decoration: none;
font-size:0.9em;
color:blue;
padding-left:40px;
}
#close{
display: none;
}
#detail {
clear:both;
padding-top:20px;
display:none;
}
hr {
border:1px dashed #f5f5f5;
}
#detail li {
font-size:0.9em;
line-height:1.4;
}
h1 {
font-size:2em;
}
h2 {
font-size:1.5em;
color:#bebebe;
font-weight:normal;
}
h3 {
font-size:1.1em;
color:#222;
}
p {
font-size:0.9em;
line-height:1.4;
text-align: justify;
}LightBox
더보기

http://localhost:52330/js9/LightBox.html
<!doctype html>
<html lang="ko">

<head>
  <meta charset="utf-8">
  <meta name="viewport" content="width=device-width">
  <title>라이트박스</title>
  <style>
    .row {
      width: 420px;
      margin: 0 auto;
    }

    .row ul {
      list-style: none;
      margin: 0;
      padding: 0;
    }

    .row ul li {
      display: inline-table;
    }

    /* 라이트박스 스타일 */
    #lightbox {
      position: fixed;
      /* 위치 고정 */
      width: 100%;
      /* 너비 */
      height: 100%;
      /* 높이 */
      background-color: rgba(0, 0, 0, 0.7);
      /* 배경색 */
      top: 0;
      /* 시작 위치 - 위쪽 */
      left: 0;
      /* 시작 위치 - 왼쪽 */
      display: none;
      /* 화면에서 감추기 */
    }

    /* 라이트박스 안의 이미지 */
    #lightbox img {
      position: absolute;
      /* top, left 기준으로 위치 지정 */
      top: 50%;
      /* 위쪽에서 50% */
      left: 50%;
      /* 왼쪽에서 50% */
      transform: translate(-50%, -50%);
      /* 요소를 화면 중앙으로 이동 */
      border: 5px solid #eee;
      /* 이미지 테두리 */
    }
  </style>
  <!-- <link rel="stylesheet" href="css/lightbox.css"> -->
</head>

<body>
  <div class="row">
    <ul>
      <li><img src="/images/tree-1-thumb.jpg" data-src="/images/tree-1.jpg" class="pic"></li>
      <li><img src="/images/tree-2-thumb.jpg" data-src="/images/tree-2.jpg" class="pic"></li>
      <li><img src="/images/tree-3-thumb.jpg" data-src="/images/tree-3.jpg" class="pic"></li>
      <li><img src="/images/tree-4-thumb.jpg" data-src="/images/tree-4.jpg" class="pic"></li>
      <li><img src="/images/tree-5-thumb.jpg" data-src="/images/tree-5.jpg" class="pic"></li>
      <li><img src="/images/tree-6-thumb.jpg" data-src="/images/tree-6.jpg" class="pic"></li>
    </ul>
  </div>

  <div id="lightbox">
    <img src="images/tree-1.jpg" alt="" id="lightboxImage">
  </div>

  <script>
    var pics = document.getElementsByClassName("pic");
    //.pic인 요소들을 가져와 pics라는 변수에 저장 querySelectorAll ("pic")도 가능
    var lightbox = document.getElementById("lightbox");
    //라이트 박스 요소를 가져옴 querySelector("#lightbox")도 가능
    var lightboxImage = document.getElementById("lightboxImage");
    // 라이트 박스 안의 이미지 요소를 가져옴 querySelector("#lightbox")도 가능

    for (var i=0; i<pics.length; i++){
      pics[i].addEventListener("click", showLightbox);
      //pics 배열의 i번째 요소를 클릭할 경우 showLightbox 함수를 실행
    }
    function showLightbox() {
      var bigLocation = this.getAttribute("data-src");
      // 썸네일 속성 값을 가져옴. bigLocation = this.data-src; 도 가능
      lightboxImage.setAttribute("src", bigLocation);
      // 라이트박스의 이미지 경로 수정 lightboxImage.src = bigLocation;도 가능
      lightbox.style.display = "block"; //라이트 박스 이미지를 화면에 표시
    }

    lightbox.onclick = function() {
      lightbox.style.display = "none";
    }
  </script>

</body>

</html>
가위바위보 게임
더보기
http://localhost:52330/js9/rps.html
<!DOCTYPE html>
<html>
<head>
<meta charset="ko">
<title>Insert title here</title>
<script>
    // 컴퓨터가 random으로 내는 값.
    var arr = [ "가위", "바위", "보" ];
    // 게임의 총수
    var total = 0;
    // 게임 이긴 횟수
    var win = 0;
    // 게임 진 횟수
    var lose = 0;
    // 게임 비긴 횟수
    var draw = 0;
    window.addEventListener("load", function() {
        var play = document.querySelector("#play");
        // 버튼을 클릭하면 컴퓨터가 랜덤 값 발생.
        play.addEventListener("click", function() {
            // 0, 1, 2 를 출력하게 만든것이다.
            var ran = Math.floor(Math.random() * 3);
            // 0, 1, 2
            var com = arr[ran];

            // 확인용
            console.log(com);
            var my = document.querySelector("#rps").value;
            var output = document.querySelector("#output");
            if ("" == my) {
                alert("가위,바위,보 중 선택 하세요");
            } else {
                // 승,무,패 를 가려서 저장
                // 게임 횟수 누적
                total++;
                // 결과물을 담을 임의의 변수
                var result = "";
                // 무 계산
                if (my == com) {
                    draw++;
                    result = "비겼습니다.";
                    // 승 계산
                } else if ((my == "가위" && com == "보")
                        || (my == "바위" && com == "가위")
                        || (my == "보" && com == "바위")) {
                    win++;
                    result = "이겼습니다.";
                    // 패 계산
                } else if ((my == "가위" && com == "바위")
                        || (my == "바위" && com == "보")
                        || (my == "보" && com == "가위")) {
                    result = "졌습니다.";
                    lose++;
                }
                output.innerHTML += result + "\n" + total + "전" + win + "승"
                        + draw + "무" + lose + "패 \n";
            }
        });
    });
</script>
</head>
<body>
    <!-- User 선택 -->
    <select id="rps">
        <option value="">선택하시오</option>
        <option value="가위">가위</option>
        <option value="바위">바위</option>
        <option value="보">보</option>
    </select>
    <input id="play" type="button" value="play">
    <br>
    <textarea id="output" rows="5" cols="30"></textarea>
</body>
</html>'대우개발원 수업 내용 > Javascript' 카테고리의 다른 글
| Javascript 6일차 함수 return문 / 스코프 / 호이스팅 (1) | 2025.12.24 |
|---|---|
| Javascript 5일차 함수(function) (0) | 2025.12.23 |
| Javascript 4일차 array / for in / break / continue (0) | 2025.12.22 |
| Javascript 3일차 조건문 연습 / 반복문 (1) | 2025.12.19 |
| javascript 2일차 조건문 if / else / switch (0) | 2025.12.18 |